Battery switch on travel trailer function is crucial for managing your RV’s power. Understanding how your battery switch works is key to preventing electrical issues and maximizing your off-grid adventures. This guide will walk you through the different types of switches, troubleshooting tips, safety precautions, and maintenance best practices, ensuring you’re ready for any situation on the road.
From simple 1-2-both switches to more complex systems managing multiple battery banks, we’ll cover it all. Learn how to properly connect to shore power, utilize your generator, and conserve battery life efficiently. We’ll also explore the integration of your battery switch with other essential RV systems, such as your converter and inverter, to ensure a smooth and reliable power supply for all your appliances.
Understanding Battery Switch Functionality in Travel Trailers: Battery Switch On Travel Trailer Function
Your travel trailer’s battery switch is a crucial component for managing power sources and extending the life of your batteries. Understanding its function and proper use is essential for a smooth and enjoyable camping experience. This section will explain the different types of switches, their purpose, and how to use them safely.
Types of Battery Switches
Travel trailers typically utilize one of several battery switch types. Each offers a different level of control over your power sources. The most common types include 1-2-Both switches, rotary switches, and more advanced digital switches with remote control capabilities.
Purpose of a Battery Switch
The primary purpose of a battery switch is to control the flow of power between your house batteries, shore power (from a campground hookup), and your generator. This allows you to isolate your batteries, charge them from external sources, or use them to power your trailer’s appliances independently. Proper management prevents accidental drain and maximizes battery lifespan.
Using a Battery Switch: A Step-by-Step Guide
Using your battery switch correctly is vital for both safety and preventing damage to your electrical system. Here’s a simple guide:
- Identify your switch type: Familiarize yourself with your specific battery switch and its markings (1-2-Both, OFF, etc.).
- Shore Power Connection: When connected to shore power, switch to the “Both” or equivalent position to charge your batteries while running appliances from shore power.
- Generator Operation: When using a generator, again, switch to “Both” or equivalent to charge batteries and power appliances from the generator.
- Battery-Only Operation: When using only battery power (e.g., boondocking), switch to the position that isolates the shore power and generator, directing power solely from your house batteries.
- Turning off the switch: When storing your trailer for an extended period, switch to the “OFF” position to prevent accidental drain on your batteries.
Comparison of Battery Switch Types
The table below summarizes the features and benefits of different battery switch types.
| Switch Type | Features | Benefits | Drawbacks |
|---|---|---|---|
| 1-2-Both | Simple three-position switch; selects either battery 1, battery 2, or both. | Easy to understand and use; inexpensive. | Limited control; may not be suitable for complex setups. |
| Rotary Switch | Multiple positions for various power source combinations (e.g., battery 1, battery 2, both, off, shore power only). | More control over power sources than 1-2-Both; generally more durable. | Can be more complex to understand initially; slightly more expensive. |
| Digital Switch (with remote) | Advanced control via digital display and sometimes remote; often includes features like battery monitoring. | Precise control, monitoring capabilities, convenience; often integrates with other systems. | Most expensive; can be more complex to set up and troubleshoot. |
Troubleshooting Common Battery Switch Issues
So, your travel trailer’s battery switch isn’t cooperating? Don’t worry, it’s a fairly common problem with straightforward solutions in most cases. Let’s dive into how to diagnose and fix some typical issues. Remember safety first – always disconnect the battery’s negative terminal before working on the switch or wiring.Troubleshooting a malfunctioning battery switch involves a systematic approach, starting with the simplest checks and moving to more complex diagnostics.
This ensures you don’t waste time on unnecessary repairs. The goal is to isolate the problem – is it the switch itself, the wiring, a blown fuse, or something else entirely?
Identifying Common Problems and Their Causes
Common problems include a complete lack of power to the trailer, flickering lights, or certain appliances not working. These issues can stem from a faulty switch, corroded connections, blown fuses, or even a problem with the batteries themselves. Sometimes, the problem isn’t even the switch; it might be a loose wire or a corroded connection elsewhere in the system.
Before you start replacing parts, carefully check everything.
Diagnosing a Faulty Battery Switch
First, visually inspect the switch. Look for any obvious signs of damage, such as loose wires, burnt connections, or a physically broken switch. Then, check the fuses both in the switch itself and in the trailer’s fuse box. A blown fuse will often show a broken filament inside the glass casing. Use a multimeter to test the continuity of the switch.
With the switch in the “on” position, you should have a closed circuit; otherwise, the switch is faulty. If you have a multimeter, you can test the voltage at different points in the system to pinpoint where the power is dropping out. For example, test the voltage at the battery terminals, then at the switch input, and finally at the output going to the trailer.
A significant voltage drop indicates a problem in that section of the circuit.
Troubleshooting Steps for Common Malfunctions
If the problem is a blown fuse, replace it with a fuse of the same rating. If the fuse blows again immediately, there’s a short circuit somewhere in the system. You’ll need to carefully trace the wiring to find the short. If the switch itself is faulty, replacement is usually necessary. This involves disconnecting the wires, removing the old switch, and installing a new one, ensuring all connections are secure and free of corrosion.
If the issue is corroded connections, clean them thoroughly with a wire brush and apply a corrosion inhibitor. Loose wires need to be tightened and reconnected securely.
Potential Causes and Solutions
Here’s a table summarizing common causes and their solutions:
| Problem | Possible Cause | Solution |
|---|---|---|
| No power to trailer | Blown fuse | Replace fuse; check for short circuit if fuse blows again. |
| No power to trailer | Faulty battery switch | Replace the battery switch. |
| Intermittent power | Loose wire connections | Tighten and secure all wire connections; clean corroded connections. |
| Some appliances not working | Faulty appliance wiring | Check wiring to the appliance. |
| No power to trailer | Dead or low batteries | Charge or replace batteries. |
Battery Switch and Electrical System Integration
Your travel trailer’s battery switch is the central hub controlling power flow from your batteries to the rest of your electrical system. Understanding its interaction with other components is crucial for safe and efficient operation. This section details how the switch works with your converter and inverter, providing a simplified diagram and crucial safety tips.The battery switch acts as a gatekeeper, selectively routing power from your house batteries (typically 12V DC) to various parts of your trailer’s electrical system.
This system includes the converter, which transforms 12V DC to 120V AC for household appliances, and the inverter, which performs the reverse operation, converting 12V DC to 120V AC to power specific devices. The proper functioning of the switch ensures the correct power source is used for each component, protecting your appliances and preventing potential damage.
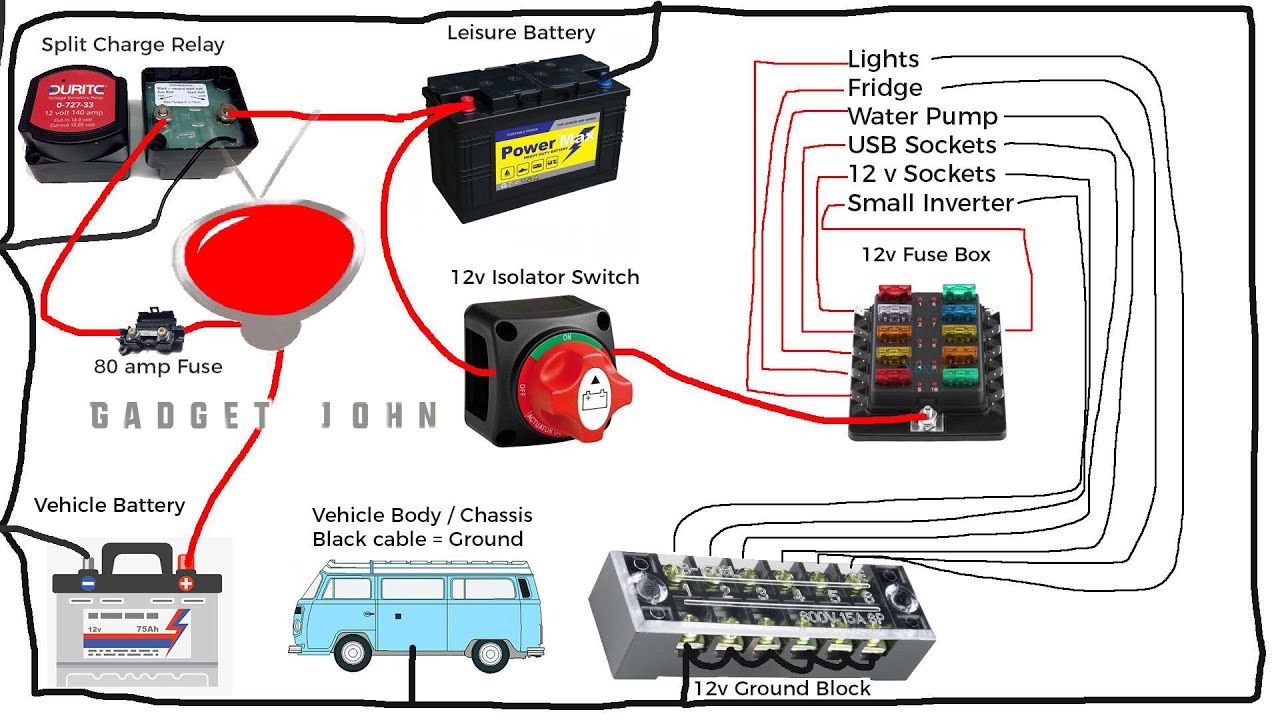
Simplified Electrical System Diagram
Imagine a simple diagram. On the left, you have your two house batteries (Battery 1 and Battery 2), connected in parallel. From the batteries, two heavy-gauge wires lead to the battery switch. The switch itself has several positions: “Off,” “Battery,” “Both Batteries,” and “Shore Power.” From the “Battery” and “Both Batteries” positions, a single wire runs to the positive (+) terminal of your 12V DC system.
A separate, thicker wire connects the negative (-) terminal of your batteries directly to the negative terminal of your 12V DC system, bypassing the switch for safety. This 12V DC system feeds power to the trailer’s lights, water pump, and other 12V DC appliances. From this 12V DC system, wires also lead to both the converter and the inverter.
The converter then sends 120V AC power to your outlets and appliances, while the inverter converts 12V DC to 120V AC to power certain devices as needed. Finally, a shore power connection (typically 30 or 50 amp) connects to the converter, providing external power when plugged into a campsite’s electrical hookup. This shore power connection also often has a dedicated breaker or fuse.
Safety Precautions When Working with the Battery Switch and Electrical System
Always disconnect the negative (-) battery cable before performing any work on your travel trailer’s electrical system. This prevents accidental shorts and protects you from electric shock. Wear appropriate safety glasses to protect your eyes from sparks or battery acid splashes. Use insulated tools to avoid accidental contact with live wires. If you’re unsure about any aspect of your electrical system, consult a qualified RV technician.
So, you’re an audiophile who loves to travel? Awesome! First things first, check out this guide on creating the perfect audiophile travel setup to ensure your tunes sound amazing wherever you roam. Then, and this is super important, secure your trip with solid travel insurance. Look into Aon travel insurance ; they often have good coverage for expensive gear, which is a must-have for any audiophile on the move.
Having both sorted will make your adventures way smoother and less stressful!
Never work on the electrical system in wet or damp conditions.
Examples of Improper Battery Switch Use and Resulting Damage
Improperly switching between battery and shore power without allowing sufficient time for the system to stabilize can lead to voltage spikes, potentially damaging sensitive electronic components like your converter or inverter. For example, rapidly switching from “Shore Power” to “Battery” while the converter is still running can cause a surge of power, damaging the converter’s internal components. Similarly, leaving the switch in the “Both Batteries” position while connected to shore power can overcharge your batteries, leading to damage or even explosion.
Another example is failing to turn the switch to “Off” before performing any maintenance on the electrical system; this increases the risk of electric shock.
Maintaining and Replacing a Battery Switch
Keeping your travel trailer’s battery switch in good working order is crucial for reliable power. Regular maintenance prevents problems and extends the lifespan of your switch, saving you from costly repairs down the road. Neglecting maintenance can lead to corrosion, poor connections, and ultimately, battery switch failure.Regular maintenance is straightforward and only takes a few minutes. A well-maintained switch ensures a safe and efficient power supply to your trailer’s electrical system.
Routine Maintenance Procedures
Clean connections and check for corrosion are the most important aspects of battery switch maintenance. Corrosion can build up on the terminals, hindering the flow of electricity and potentially causing overheating. Start by disconnecting the battery cables from the switch. Use a wire brush or sandpaper to clean the terminals thoroughly, removing any dirt, grime, or corrosion.
Apply a dielectric grease to the cleaned terminals to prevent future corrosion. Visually inspect the switch itself for any signs of damage or loose connections. Tighten any loose screws or bolts. Reconnect the battery cables, ensuring a secure connection. This simple routine should be performed at least once a year, or more frequently if you notice any signs of corrosion or performance issues.
Battery Switch Replacement
Replacing a faulty battery switch is a relatively simple process, but it’s crucial to disconnect the batteries before starting any work to prevent electrical shock. First, disconnect the negative (-) battery cable from the battery. Then, disconnect the positive (+) cable. Next, carefully remove any screws or fasteners holding the battery switch in place. Once removed, note the wiring configuration before disconnecting the wires from the old switch.
This will help you reconnect everything correctly to the new switch. Install the new switch, ensuring that all connections are secure and tight. Reconnect the wires according to your notes, paying close attention to the positive and negative terminals. Finally, reconnect the battery cables, starting with the positive (+) cable and then the negative (-) cable. Test the switch to ensure it functions correctly.
Selecting a Replacement Battery Switch
Choosing the right replacement battery switch involves considering amperage and other specifications. The amperage rating of the switch should be equal to or greater than the total amperage draw of your trailer’s electrical system. A higher amperage rating provides a safety margin and prevents the switch from overheating. Other factors to consider include the type of switch (e.g., single or dual battery switch), mounting style, and the overall quality and durability of the switch.
Always refer to your trailer’s wiring diagram to determine the correct amperage rating and other specifications. Choosing a switch with a higher amperage rating than needed isn’t harmful, but choosing one that’s too low could lead to overheating and failure.
Tools and Materials Required for Battery Switch Replacement
Before you begin the replacement, gather the necessary tools and materials. This will ensure a smooth and efficient process.
So, you’re an audiophile who travels? Awesome! Check out this guide on creating the perfect audiophile travel setup to keep your ears happy on the go. It’s all about packing smart and prioritizing sound quality. And while you’re planning your trip, remember to sort out your travel insurance; getting Aon travel insurance is a good idea for peace of mind, covering unexpected events that might ruin your trip.
Don’t forget to research your destination’s plug types and voltage, too!
- New battery switch (with appropriate amperage rating)
- Wire brush or sandpaper
- Dielectric grease
- Screwdrivers (Phillips and flathead, as needed)
- Wrench (size appropriate for battery terminals)
- Voltmeter (optional, for testing)
- Work gloves
- Safety glasses
Advanced Battery Switch Configurations
Upgrading your travel trailer’s power system beyond a simple battery switch opens up a world of possibilities for managing multiple power sources and maximizing your off-grid capabilities. This section delves into more complex setups and the benefits they offer.Multiple battery banks offer significant advantages in terms of power management and longevity. By separating your house batteries (powering appliances and lights) from your starting battery (for the engine), you prevent draining your starting battery and ensure reliable engine starts, even after extended periods of off-grid use.
Additionally, using different battery chemistries (like lithium and lead-acid) within separate banks allows for optimized charging and usage based on each battery’s specific characteristics. However, this increased complexity necessitates careful planning and potentially higher initial costs. Managing multiple banks requires more sophisticated monitoring and switching, adding to the system’s complexity.
Multiple Battery Banks with Separate Switches, Battery switch on travel trailer function
Employing separate switches for multiple battery banks provides granular control over power distribution. Each bank can be isolated or connected independently to the main power system, offering flexibility in managing power consumption and charging. For instance, you might dedicate one bank solely to essential appliances while another powers non-essential items. This setup, however, requires careful wiring and understanding of the amperage requirements for each circuit to prevent overloading.
A visual representation would show two battery banks, each with its own switch, and both feeding into a central distribution panel. Each switch would be labeled clearly, indicating its assigned bank (e.g., “House Batteries,” “Starting Battery”). This allows for precise control over which bank is supplying power to the trailer’s various circuits. Improper wiring in such a setup can lead to short circuits and potential fire hazards.
Battery Management Systems (BMS) Integration
Battery management systems (BMS) significantly enhance the capabilities of multiple battery banks. A BMS continuously monitors voltage, current, temperature, and state of charge (SOC) for each battery, preventing overcharging, over-discharging, and overheating. Different BMS types exist, from simple voltage monitors to sophisticated systems that manage charging profiles, balance cell voltages in lithium batteries, and communicate with other components like solar charge controllers and inverters.
For example, a Victron Energy MultiPlus II inverter/charger can integrate with a Victron Battery Monitor to provide real-time data on battery health and usage. This level of integration streamlines power management and extends the lifespan of your batteries.
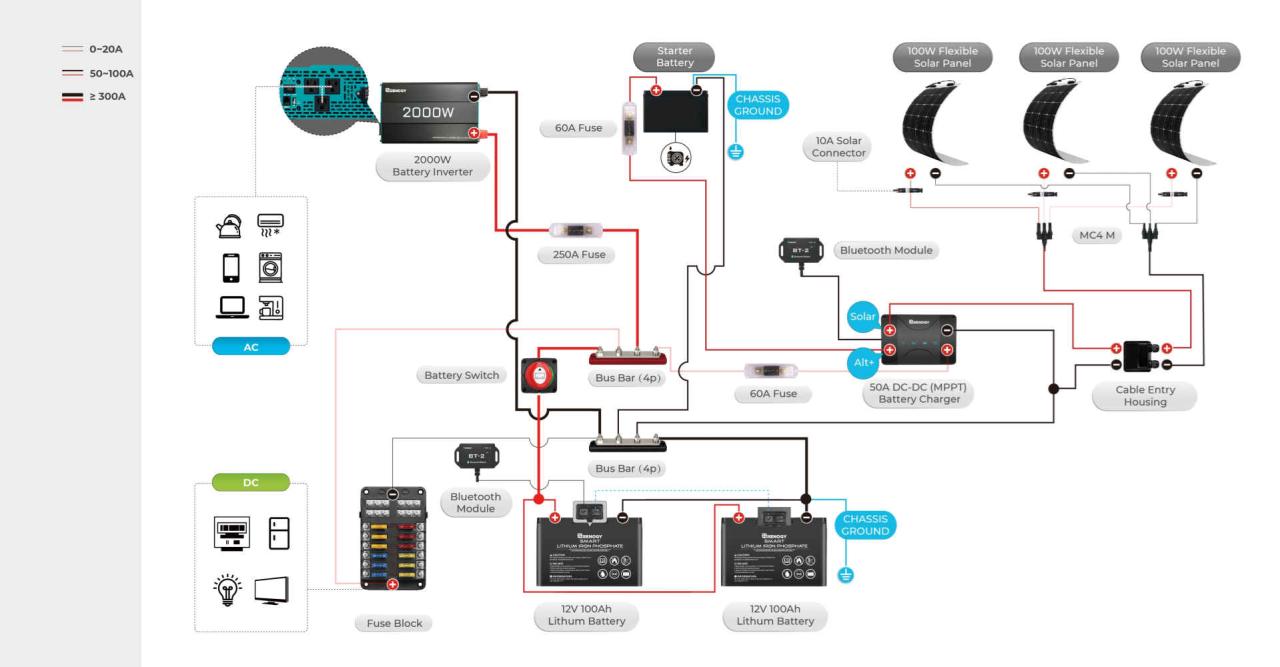
Solar Charging System Integration
Integrating a solar charging system with a battery switch allows for efficient solar power harvesting and distribution. The solar charge controller regulates the current flowing from the solar panels to the batteries, preventing overcharging. The battery switch allows you to selectively use the solar-charged batteries to power your trailer, even when disconnected from shore power. For instance, a setup might involve a solar panel array charging a dedicated house battery bank through a dedicated charge controller.
This bank is then connected to the main power system via the battery switch, providing off-grid power. Without a battery switch, this controlled distribution would not be possible. A proper solar charge controller with MPPT (Maximum Power Point Tracking) will maximize the energy harvested from your solar panels.
Prioritizing Power Sources
A battery switch can be configured to prioritize power sources, ensuring that shore power is used preferentially over battery power. This preserves battery life and reduces the risk of running down your batteries prematurely. Many battery switches have a “shore power” or “12V” position that prioritizes the connection to shore power, and only switches to the battery bank when shore power is unavailable.
This setup is easily implemented with most standard battery switches and is a common practice to ensure that the batteries are only used as a backup power source.
Mastering your travel trailer’s battery switch isn’t just about avoiding dead batteries; it’s about ensuring a safe and enjoyable RV experience. By understanding the different types of switches, their functions, and how to troubleshoot common problems, you’ll be empowered to maintain your RV’s electrical system and extend the life of your batteries. Remember to always prioritize safety when working with electricity.
Happy travels!
Common Queries
What happens if I leave my battery switch in the “off” position?
Leaving the switch off completely disconnects your batteries from the rest of the RV’s electrical system. This prevents your batteries from draining, but also means you won’t have power to anything running off the batteries.
Can I use a battery switch with a solar panel setup?
Yes, many solar charging systems integrate seamlessly with battery switches. This allows you to control whether solar power charges your batteries directly or goes through other systems first.
How often should I check my battery switch connections?
It’s a good idea to inspect your battery switch connections at least once a year, or more often if you notice any signs of corrosion or loose connections. Cleaning the terminals and tightening connections will prevent issues.
What size battery switch do I need?
The correct amperage rating for your battery switch depends on the total amperage draw of your RV’s electrical system. It’s best to consult your RV’s manual or a qualified electrician to determine the appropriate size.
